从 Spring Boot 2.x 开始 Lettuce 已取代 Jedis 成为首选 Redis 的客户端。当然 Spring Boot 2.x 仍然支持 Jedis,并且你可以任意切换客户端。
Lettuce
Lettuce 是一个可伸缩的线程安全的 Redis 客户端,支持同步、异步和响应式模式。多个线程可以共享一个连接实例,而不必担心多线程并发问题。它基于优秀 Netty NIO 框架构建,支持 Redis 的高级功能,如 Sentinel、集群、流水线、自动重新连接和 Redis 数据模型
Jedis 实现通过直接连接的 redis server,如果在多线程环境下是非线程安全的,这个时候只有使用连接池,为每个 Jedis 实例增加物理连接。
Lettuce 的连接是基于 Netty 的,连接实例 (StatefulRedisConnection) 可以在多个线程间并发访问,因为 StatefulRedisConnection 是线程安全的,所以一个连接实例 (StatefulRedisConnection) 就可以满足多线程环境下的并发访问,当然这个也是可伸缩的设计,一个连接实例不够的情况也可以按需增加连接实例。
Spring Boot 2.0 集成 redis
一般需要4步
- 引入依赖
- 配置 redis
- 自定义 RedisTemplate (推荐)
- 自定义 redis 操作类 (推荐)
引入依赖
<!--redis-->
<dependency>
    <groupId>org.springframework.boot</groupId>
    <artifactId>spring-boot-starter-data-redis</artifactId>
</dependency>

<!-- lettuce pool 缓存连接池 -->
<dependency>
    <groupId>org.apache.commons</groupId>
    <artifactId>commons-pool2</artifactId>
</dependency>

<!--jackson-->
<!--<dependency>-->
<!--    <groupId>com.fasterxml.jackson.core</groupId>-->
<!--    <artifactId>jackson-databind</artifactId>-->
<!--</dependency>-->

<dependency>
            <groupId>com.alibaba</groupId>
            <artifactId>fastjson</artifactId>
            <version>1.2.67</version>
</dependency>
- 如果用的是 lettuce 客户端,需要引入 commons-pool2 连接池。
- 如果想用 json 序列化 redis 的 value 值,需要引入 jackson
配置 redis
# redis 服务端相关配置
# 服务器地址
spring.redis.host=localhost
# 端口号
spring.redis.port=6379
# 密码,默认为 null
spring.redis.password=
# 使用的数据库,默认选择下标为0的数据库
spring.redis.database=0
# 客户端超时时间,默认是2000ms
spring.redis.timeout=2000ms


## jedis 客户端配置(从 Spring Boot 2.x 开始,不再推荐使用 jedis 客户端)
## 建立连接最大等待时间,默认1ms,超出该时间会抛异常。设为-1表示无限等待,直到分配成功。
#spring.redis.jedis.pool.max-wait=1ms
## 最大连连接数,默认为8,负值表示没有限制
#spring.redis.jedis.pool.max-active=8
## 最大空闲连接数,默认8。负值表示没有限制
#spring.redis.jedis.pool.max-idle=8
## 最小空闲连接数,默认0。
#spring.redis.jedis.pool.min-idle=0


# lettuce 客户端配置(从 Spring Boot 2.x 开始,推荐使用 lettuce 客户端)
# 建立连接最大等待时间,默认1ms,超出该时间会抛异常。设为-1表示无限等待,直到分配成功。
spring.redis.lettuce.pool.max-wait=1ms
# 最大连连接数,默认为8,负值表示没有限制
spring.redis.lettuce.pool.max-active=8
# 最大空闲连接数,默认8。负值表示没有限制
spring.redis.lettuce.pool.max-idle=8
# 最小空闲连接数,默认0。
spring.redis.lettuce.pool.min-idle=0
# 设置关闭连接的超时时间
spring.redis.lettuce.shutdown-timeout=100ms
自定义 RedisTemplate
RedisTemplate 是 spring 为我们提供的 redis 操作类,通过它我们可以完成大部分 redis 操作。
只要我们引入了 redis 依赖,并将 redis 的连接信息配置正确,springboot 就会根据我们的配置会给我们生成默认 RedisTemplate。
但是默认生成的 RedisTemplate 有两个地方不是很符合日常开发中的使用习惯
- 默认生成的
RedisTemplate<K, V>接收的key和value为泛型,经常需要类型转换,直接使用不是很方便 - 默认生成的 RedisTemplate 序列化时,使用的是 JdkSerializationRedisSerializer ,存储到 redis 中后,内容为二进制字节,不利于查看原始内容
对于第一个问题,一般习惯将 RedisTemplate<K, V> 改为 RedisTemplate<String, Object>,即接收的 key 为 String 类型,接收的 value 为 Object 类型 对于第二个问题,一般会把数据序列化为 json 格式,然后存储到 redis 中,序列化成 json 格式还有一个好处就是跨语言,其他语言也可以读取你存储在 redis 中的内容
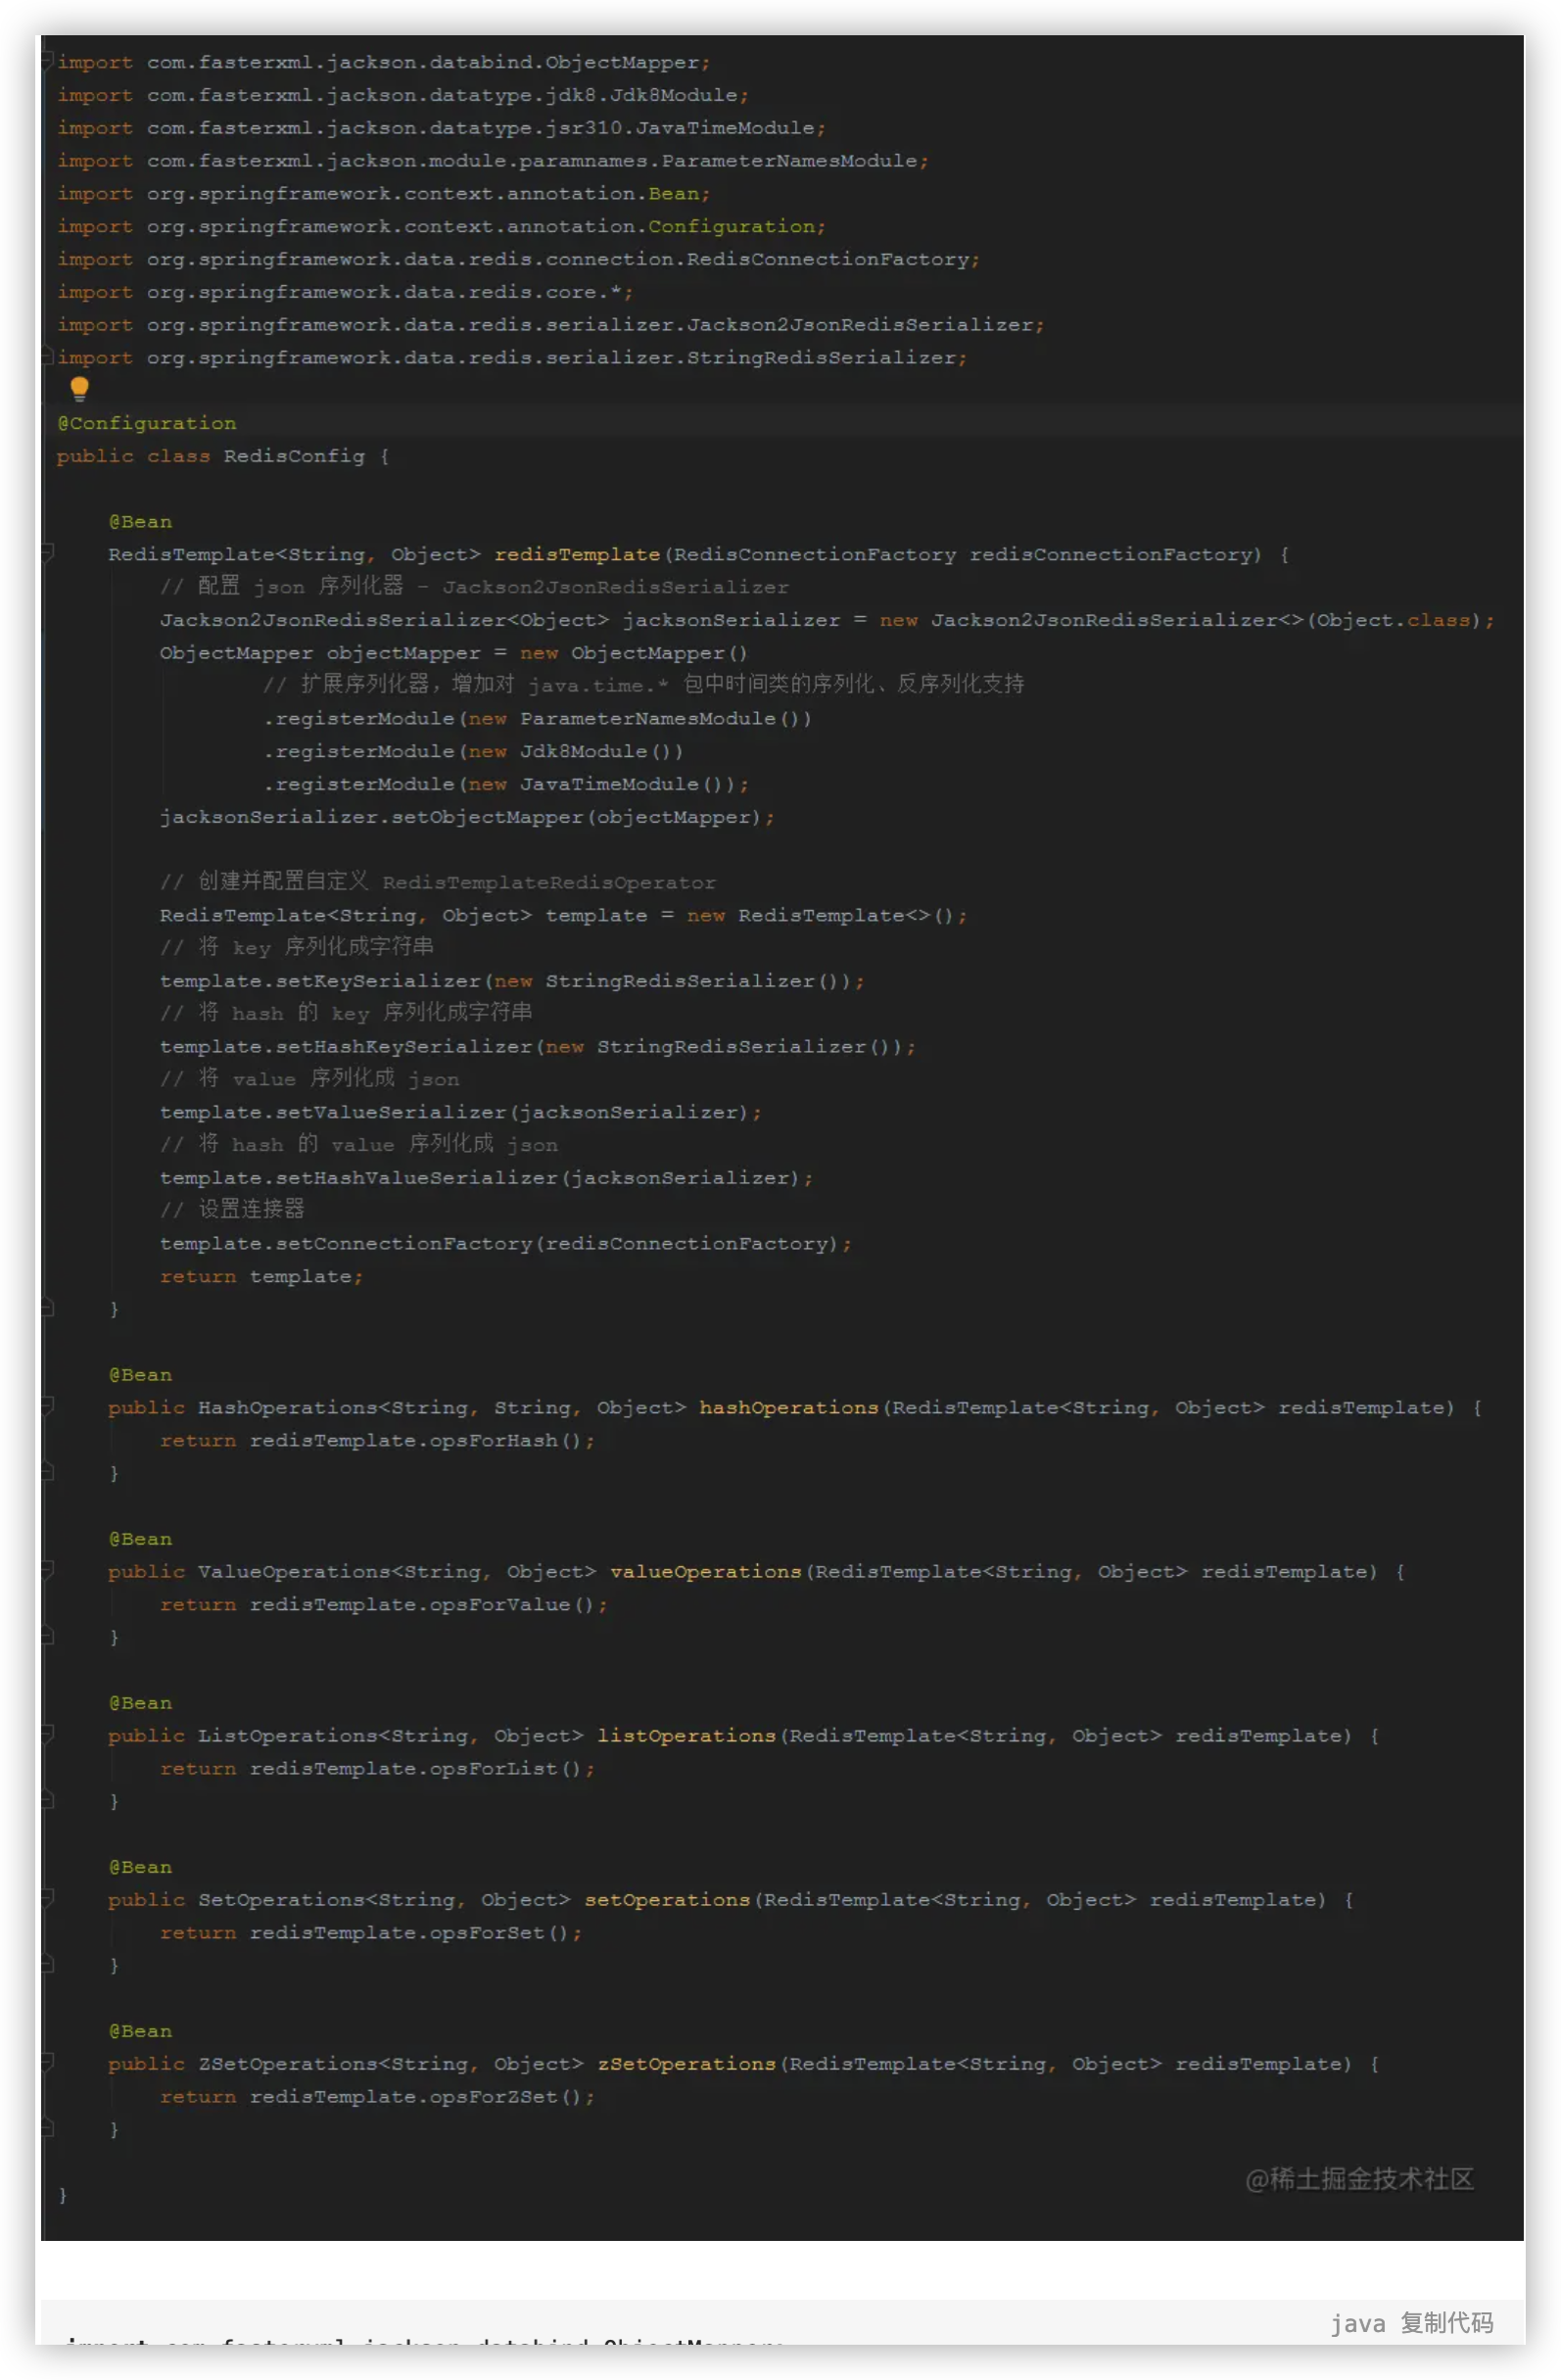
为了实现上面两个目的,我们需要自定义自己的 RedisTemplate。
如下,创建一个 config 类,在里面配置 自定义的 RedisTemplate
import com.fasterxml.jackson.databind.ObjectMapper;
import com.fasterxml.jackson.datatype.jdk8.Jdk8Module;
import com.fasterxml.jackson.datatype.jsr310.JavaTimeModule;
import com.fasterxml.jackson.module.paramnames.ParameterNamesModule;
import org.springframework.context.annotation.Bean;
import org.springframework.context.annotation.Configuration;
import org.springframework.data.redis.connection.RedisConnectionFactory;
import org.springframework.data.redis.core.*;
import org.springframework.data.redis.serializer.Jackson2JsonRedisSerializer;
import org.springframework.data.redis.serializer.StringRedisSerializer;

@Configuration
public class RedisConfig {

    @Bean
    RedisTemplate<String, Object> redisTemplate(RedisConnectionFactory redisConnectionFactory) {
        // 配置 json 序列化器 - Jackson2JsonRedisSerializer
        Jackson2JsonRedisSerializer<Object> jacksonSerializer = new Jackson2JsonRedisSerializer<>(Object.class);
        ObjectMapper objectMapper = new ObjectMapper()
                // 扩展序列化器,增加对 java.time.* 包中时间类的序列化、反序列化支持
                .registerModule(new ParameterNamesModule())
                .registerModule(new Jdk8Module())
                .registerModule(new JavaTimeModule());
        jacksonSerializer.setObjectMapper(objectMapper);

        // 创建并配置自定义 RedisTemplateRedisOperator
        RedisTemplate<String, Object> template = new RedisTemplate<>();
        // 将 key 序列化成字符串
        template.setKeySerializer(new StringRedisSerializer());
        // 将 hash 的 key 序列化成字符串
        template.setHashKeySerializer(new StringRedisSerializer());
        // 将 value 序列化成 json
        template.setValueSerializer(jacksonSerializer);
        // 将 hash 的 value 序列化成 json
        template.setHashValueSerializer(jacksonSerializer);
        // 设置连接器
        template.setConnectionFactory(redisConnectionFactory);
        return template;
    }

    @Bean
    public HashOperations<String, String, Object> hashOperations(RedisTemplate<String, Object> redisTemplate) {
        return redisTemplate.opsForHash();
    }

    @Bean
    public ValueOperations<String, Object> valueOperations(RedisTemplate<String, Object> redisTemplate) {
        return redisTemplate.opsForValue();
    }

    @Bean
    public ListOperations<String, Object> listOperations(RedisTemplate<String, Object> redisTemplate) {
        return redisTemplate.opsForList();
    }

    @Bean
    public SetOperations<String, Object> setOperations(RedisTemplate<String, Object> redisTemplate) {
        return redisTemplate.opsForSet();
    }

    @Bean
    public ZSetOperations<String, Object> zSetOperations(RedisTemplate<String, Object> redisTemplate) {
        return redisTemplate.opsForZSet();
    }

}
自定义 Redis 操作类
虽然 RedisTemplate 已经对 redis 的操作进行了一定程度的封装,但是直接使用还是有些不方便,实际开发中,一般会对 RedisTemplate 做近一步封装,形成一个简单、方便使用的Redis 操作类。
当然你也可以选择不封装,看个人喜好。
具体的封装类参考基于 RedisTemplate 自定义 Redis 操作类。
Spring Cache
Spring Cache 是 Spring 为缓存场景提供的一套解决方案。通过使用 @CachePut、@CacheEvict、@Cacheable等注解实现对缓存的,存储、查询、删除等操作
当我们引入了 spring-boot-starter-data-redis 后,只要在带有@Configuration类上使用 @EnableCaching 注解 Spring Cache 就会被“激活”。
Spring Cache 会为我们配置默认的缓存管理器和key生成器,但是缓存管理器对缓存的序列化和key生成器生成的key,不易阅读。建议自定义缓存管理器和key生成器
如果用不上 Spring Cache ,可以不用管。
注意:Spring Cache 并不是只能使用 Redis 作为缓存容器,其他例如 MemCache 等缓存中间件,都支持。
配置 Spring Cache
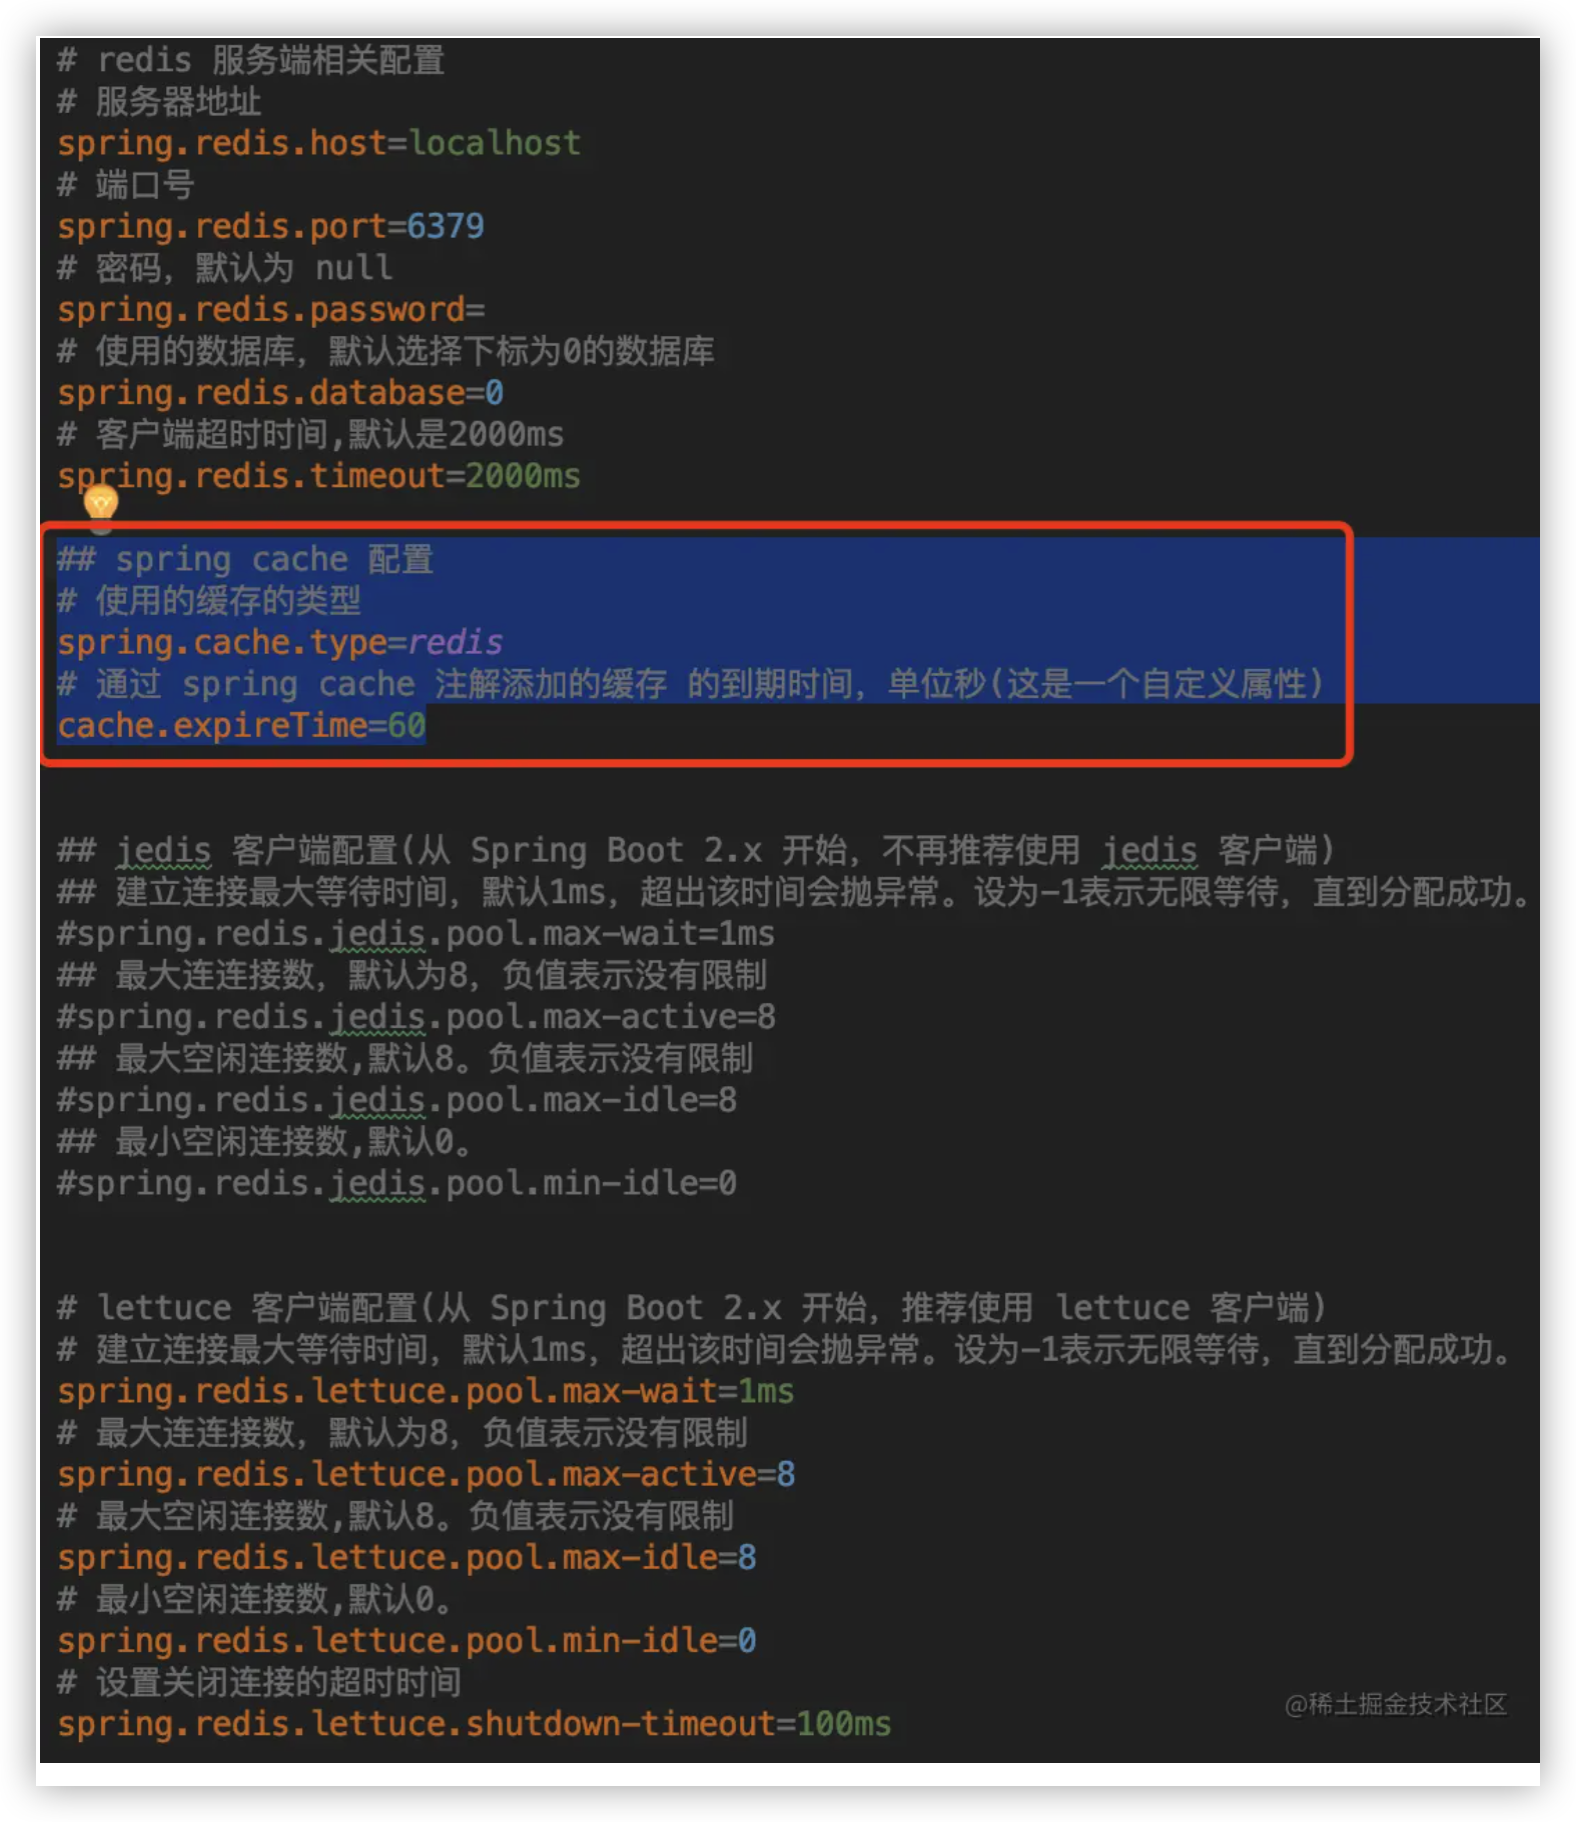
## spring cache 配置
# 使用的缓存的类型
spring.cache.type=redis
# 通过 spring cache 注解添加的缓存 的到期时间,单位秒(这是一个自定义属性)
cache.expireTime=60
最重要的就是指定使用的缓存的类型 另外是一个自定义的变量,后面配置缓存管理器会用到
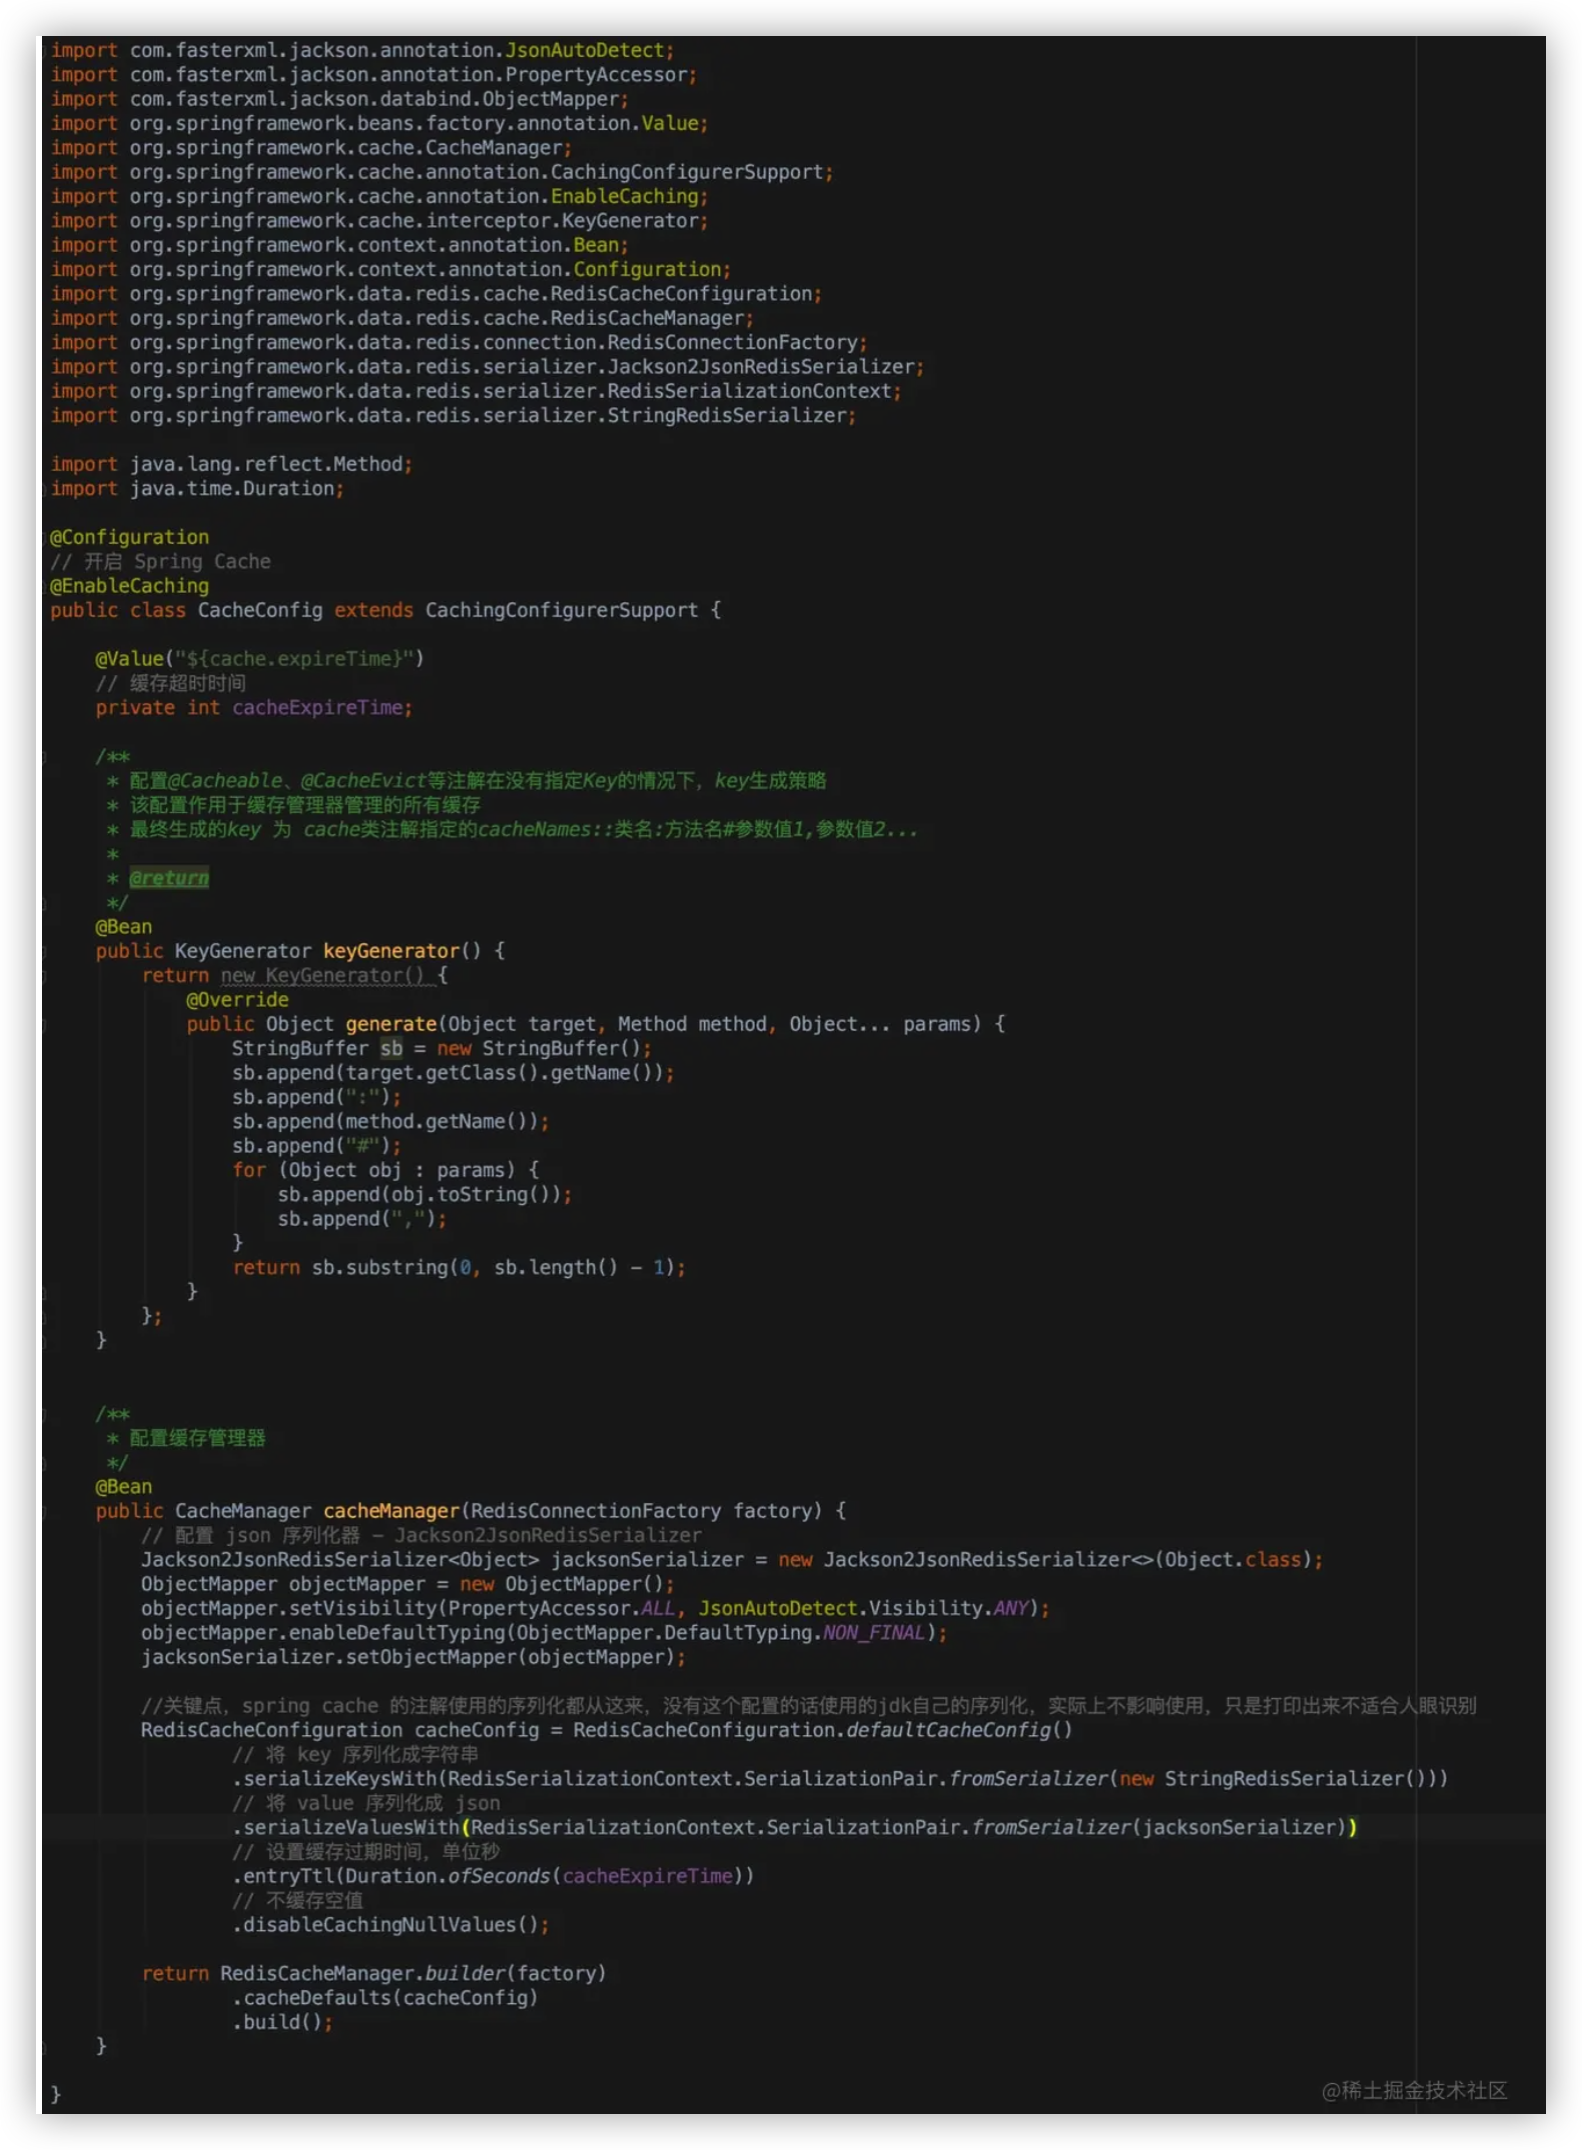
配置缓存管理器和 key 生成器
import com.fasterxml.jackson.annotation.JsonAutoDetect;
import com.fasterxml.jackson.annotation.PropertyAccessor;
import com.fasterxml.jackson.databind.ObjectMapper;
import org.springframework.beans.factory.annotation.Value;
import org.springframework.cache.CacheManager;
import org.springframework.cache.annotation.CachingConfigurerSupport;
import org.springframework.cache.annotation.EnableCaching;
import org.springframework.cache.interceptor.KeyGenerator;
import org.springframework.context.annotation.Bean;
import org.springframework.context.annotation.Configuration;
import org.springframework.data.redis.cache.RedisCacheConfiguration;
import org.springframework.data.redis.cache.RedisCacheManager;
import org.springframework.data.redis.connection.RedisConnectionFactory;
import org.springframework.data.redis.serializer.Jackson2JsonRedisSerializer;
import org.springframework.data.redis.serializer.RedisSerializationContext;
import org.springframework.data.redis.serializer.StringRedisSerializer;

import java.lang.reflect.Method;
import java.time.Duration;

@Configuration
// 开启 Spring Cache
@EnableCaching
public class CacheConfig extends CachingConfigurerSupport {

    @Value("${cache.expireTime}")
    // 缓存超时时间
    private int cacheExpireTime;

    /**
     * 配置@Cacheable、@CacheEvict等注解在没有指定Key的情况下,key生成策略
     * 该配置作用于缓存管理器管理的所有缓存
     * 最终生成的key 为 cache类注解指定的cacheNames::类名:方法名#参数值1,参数值2...
     *
     * @return
     */
    @Bean
    public KeyGenerator keyGenerator() {
        return new KeyGenerator() {
            @Override
            public Object generate(Object target, Method method, Object... params) {
                StringBuffer sb = new StringBuffer();
                sb.append(target.getClass().getName());
                sb.append(":");
                sb.append(method.getName());
                sb.append("#");
                for (Object obj : params) {
                    sb.append(obj.toString());
                    sb.append(",");
                }
                return sb.substring(0, sb.length() - 1);
            }
        };
    }


    /**
     * 配置缓存管理器
     */
    @Bean
    public CacheManager cacheManager(RedisConnectionFactory factory) {
        // 配置 json 序列化器 - Jackson2JsonRedisSerializer
        Jackson2JsonRedisSerializer<Object> jacksonSerializer = new Jackson2JsonRedisSerializer<>(Object.class);
        ObjectMapper objectMapper = new ObjectMapper();
        objectMapper.setVisibility(PropertyAccessor.ALL, JsonAutoDetect.Visibility.ANY);
        objectMapper.enableDefaultTyping(ObjectMapper.DefaultTyping.NON_FINAL);
        jacksonSerializer.setObjectMapper(objectMapper);

        //关键点,spring cache 的注解使用的序列化都从这来,没有这个配置的话使用的jdk自己的序列化,实际上不影响使用,只是打印出来不适合人眼识别
        RedisCacheConfiguration cacheConfig = RedisCacheConfiguration.defaultCacheConfig()
                // 将 key 序列化成字符串
                .serializeKeysWith(RedisSerializationContext.SerializationPair.fromSerializer(new StringRedisSerializer()))
                // 将 value 序列化成 json
                .serializeValuesWith(RedisSerializationContext.SerializationPair.fromSerializer(jacksonSerializer))//value序列化方式
                // 设置缓存过期时间,单位秒
                .entryTtl(Duration.ofSeconds(cacheExpireTime))
                // 不缓存空值
                .disableCachingNullValues();

        return RedisCacheManager.builder(factory)
                .cacheDefaults(cacheConfig)
                .build();
    }
}
总结
网上 Spring Boot 集成 redis 的教程大多都是,将 redis 和 spring cache 一块配置,很容易让人产生误解。
其实 redis 和 spring cache 是两个不同的东西,所以,上面的教程我特意分为了两个配置文件。
你可以只使用 redis 而不使用 spring cache,也可以反过来。
那为什么两者经常放在一起去讨论呢? 原因在于两者也有一定的联系
站在 reids 的角度看,spring cache 提供了一种便捷的操作 reids 的途径,为缓存场景提供了优秀的解决方案。
站在 spring cache 的角度看, reids 提供了一种缓存容器,可以把缓存放在 reids 中。
缓存管理器对 reids 的操作也是通过 redisTemplate 实现的。